Wednesday, April 1, 2020

Broadcast Announcements of Dynamics 365 in Unified Service Desk

Hello Friends! In my previous two blog posts (Working on Announcements in Dynamics 365 & Announcements using PowerApps) I walked you through about working on announcements using web-resource or by creating PowerApps control in Dynamics 365.

Today we'll see broadcasting announcements in Unified Service Desk. Before getting started I assume you have basic knowledge of what is USD, what are hosted controls, action calls, events, toolbar, etc. in USD.

Let's get started..
Step 1: Create a hosted control to show announcements in Unified Service Desk.
  • Component Type : Standard Web Application
  • Hosting Type : Chrome Process
  • Application is Global : Yes
  • Display Group : RightPanel

Step 2: Create Actions to navigate to Announcements.

As I have created two controls for announcements one is using html web-resource and another using PowerApps, here I'll create two actions either to navigate to web-resource or to PowerApps.

Actions which I am going to create will be associated with hosted control for announcements which I've created in Step 1. Navigate action for web-resource contains the url of html web-resource which I've created in this post.


 Navigate action for PowerApps control contains the url of canvas app which I've created in this post.


Step 3: Trigger the navigate action for PowerApps as a default control when USD desktop loads.

To display the announcements when USD loads we need to add the action to the DesktopReady event of CRM Global Manager.

We are ready to go and test our changes in USD, but I have created 2 different actions for 2 different controls (web-resource and PowerApps) so I'll add navigation buttons on About Toolbar of USD to navigate to any of the control.

Steps:
  • Create Announcements Toolbar button
    • Add Announcement Toolbar Button on About Toolbar.
    • Add actions for navigation and expanding Right Panel on USD.

  • Create two toolbar buttons
    • Create PowerApps Control Toolbar button and add actions for navigation & expanding Right Panel to it.
    • Create Web Control Toolbar button and add actions for navigation & expanding Right Panel to it.
    • Associate this toolbar buttons to Announcements Toolbar button.


Finally, it's time to test our changes in USD. Let's see how to renders on Unified Service Desk.


Hope you understand the steps, feel free to connect me if you need any help.

Happy Learning..!


Thursday, March 26, 2020

Announcement entity in Dynamics 365 on PowerApps

Hello Friends!! In my previous Blog post I walked you through about working on Announcement entity in Dynamics CRM.
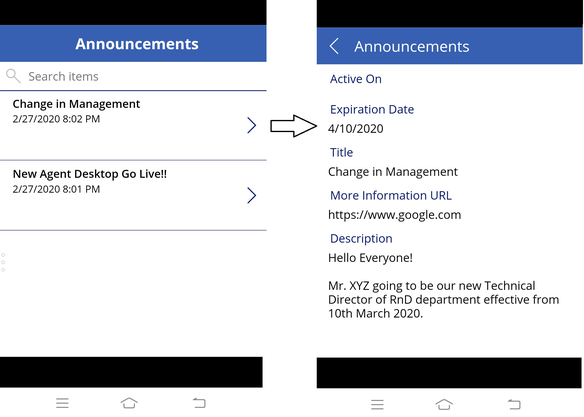
In this post we'll learn about creating PowerApps application to showcase Organizational Announcement on user's mobile, tablet, etc. or even host the application in unified service desk so that all users get to know the latest news or information of an organization.

Let's get started..

Creating PowerApps for Announcement


  • Navigate to PowerApps online IDE.
  • Go to Data > Connections > Create New Connection (Dynamics 365)

  • Now, go to Create > Start from data (other data sources).
  • Next, select Dynamics 365 connection which we have created above, then select the dataset (your organization) and finally select the table (entity) i.e. Announcements and click on Connect.


  • As we need Announcements App only for displaying the news or information of an organization and restrict users to edit the details, we'll delete the edit screen as it will be no longer required. 


  • Once we delete the edit screen, the control (+) available on main screen start showing errors which we then need to resolve. Remove the below highlighted button control and command associated with it.

  • After removing the control (+) from the browse screen the header label of the screen shows error message which we need to resolve from all the respective commands. Similarly we need to remove other two controls (Refresh & Sorting icons) and resolve the commands accordingly.


  • Similarly we need to remove controls (Delete & Edit icons) from detail screen and remove the reference of icons from all the respective commands.


After resolving all the errors (use App Checker icon available at right upper corner of the IDE to check all the errors and warnings if any) and completing UI changes it's time to publish and test the app.
  • To publish the app, Save the app and then click on Publish.

  • To test the app on your mobile or tablet, please download Power Apps application from 'Play Store' or 'App Store' and connect to your Dynamics 365 online environment and then you can see the published app.


Here we learn how to create simple PowerApps application and use it on our mobile device.

In next blog we'll learn to host this PowerApps application in Unified Service Desk so that the organization can broadcast their important information quickly at contact centers.

Happy Learning..!

Working on Announcement Entity in Dynamics 365

Sometimes customer occasionally ask for the capability of Dynamics CRM to broadcast important news or information of an organization to a wide set of users at one go so that all users get to know latest announcements without fail.

Using Announcements in Microsoft Dynamics 365 you can circulate important information quickly to a wide set of users at one go. Announcements can also server as message boards, where you can post topics of your interest that you wish to share or get answers to.

Let's get started on how to create Announcements in Dynamics CRM.

  • Make sure that you have the System Administrator or System Customizer security role or equivalent permissions.
  • Go to Settings > System.
  • Choose Administration > Announcements.
  • On the command bar choose New.
  • Fill in the information, as required.
    • Title - Type a title for the announcement that clearly and unambiguously states the purpose and nature of the announcement.
    • Body - Type the text for the announcement that you want to broadcast.
    • More Information URL - Type the address of the website that provides detailed information about the announcement. (Optional)
    • Expiration Date - Type the date on which you want to stop the broadcast and the announcement should expire.
  • Save or Save and Close to begin the broadcast.


Now, we need to broadcast the newly created announcement to other users in our organization by using HTML web-resource and dashboard or by creating PowerApps hosted in Unified Service Desk.

HTML web-resource in Dashboard
  • Go to Settings > Customizations > Customize the System.
  • Under Components, choose Web Resources > New.
  • Create new HTML web-resource.

  • In a text editor, type following code snippets.


<html>
  <head>
 <meta charset="utf-8">
  <title>Announcements</title>
  <script src="ClientGlobalContext.js.aspx"></script>
  <script type="text/javascript">
       function LoadPage(){
     window.location.href = "/home/homepage/home_news.aspx?pagemode=iframe";
    }
  </script>
 <meta>
  </head>
  <body style="margin: 0px; overflow-wrap: break-word;" onload="LoadPage()">
  </body>
</html>

  • Save and Publish the changes.
  • Add this new web-resource to any existing or new Dashboard.

As per my own experience, Yammer is the far better alternative in Dynamics CRM in place of Announcements.

In this blog post you will find how to create Announcements viewer using PowerApps.

Note: Announcements (Settings > Administration > Announcements) are deprecated and will be removed in a future major release (More Info: link)

Wednesday, March 25, 2020

Hierarchy Visualization in Dynamics 365


Dynamics CRM features a new way to visualize relationships that exists between connected records.
Hierarchy Visualizations provide a clear display of these structures by helping CRM users to navigate and understand each level.

CRM has long enabled users to define parent and child account relationships but these lacked any inbuilt views that provide a graphical overlay. From CRM 2015, Dynamics enables tree view structure to be easily configured between parent and child records.

In one of my previous Dynamics CRM implementation, customer were looking for hierarchy visualizations of Parent Contact of an Account on Account form.

Before going to start actual implementation, we need to first understand the limitations of Hierarchy Visualizations.

  • Hierarchy functions and visualizations are currently only supported within a single entity (self referential) on a 1:N basis.
  • Each hierarchy member must be of the same type, example for a Contact entity, a CRM hierarchy can involve multiple Contacts but it is not possible to bring an Account, or any other related CRM entity into hierarchy structure.
  • The CRM hierarchy view will only fit a maximum of 4 tiles horizontally into the view, and these are shown in alphabetical order by default.
  • If a hierarchy level has more than 4 records then the view will show the number of additional records either side of the present window enabling users to scroll left or right to browse other tiles.

Let's get started with implementation part;

  • Go to Customizations > Customize the System > Contact Entity (expand) > Fields > New.
  • Create a new self-referential lookup field named 'Parent Contact' or ' Manager' and place it on the Contact main form.

  • Go to Customizations Customize the System > Contact Entity (expand) > Forms New
  • Create a new Quick View Form to show as Contact Tile.
  • Now, go to Hierarchy Settings of Contact entity and create new settings as below.
    • Name - Type the name for your hierarchy settings in my case 'new_hierarchy_contact'.
    • Default Quick View Form - Select quick view form which you have created as above.
    • Hierarchical Relationship - We previously created a self-referential field called 'Parent Contact' or 'Manager' as created above that will look-up other records specific to contact entity so this has been selected for the hierarchy relationship setting.
  • To ensure the relationship is enabled for hierarchies click the link 'Mark a relationship as enabled for hierarchies', select the self-referential field and click on 'Mark hierarchical' and Done.
  • Publish the customization.

Now, its time to test the changes:
On the Contact form we've added a new self-referential field named 'Manager' that will determine the hierarchy structure between parent and child records.


For the above contact record, Thomas Andersen (sample) have manager set as Jim Glynn (sample).
Only one parent can be set so in this case no additional manager can be defined for this contact. However, as this is a 1:N relationship multiple child contacts can have same parent contact or manager in the system as below;


An existing hierarchy visualization can be opened from any record by clicking 'View Hierarchy' ribbon button or from view.


Now, we are able to see the contact hierarchy available in the CRM. But, as I said earlier the actual requirement was to show this contact hierarchy at Account level or say on Account form.

On Account form, we will be having Primary Contact and associate contacts as below;


To give the contact hierarchy visualization on Account form, we will add new web-resource and pass primary contact id to it and show the hierarchy in section on the form.
  • Go to Customizations Customize the System.
  • Under Components, select Web Resources > New.
  • Create new HTML web-resource and add below given code snippets;

<html>
  <head>
 <meta charset="utf-8">
 <style>
   html, body{
    height:100%;
    font-family: Arial, Helvetica, sans-serif;
     } 
    .button {
    background-color: #161515;
    border: none;
    color: #fff;
    font-weight:600;
    padding: 1% 1%;
    text-align: center;
    text-decoration: none;
    display: inline-block;
    font-size: 12px;
    margin: 4px 2px;
    cursor: pointer;
    border: none;
    border-radius: 10px;
   }
      .button:hover {background-color: #5C5959}
   .button:focus {box-shadow:none;}
   * {box-sizing: border-box;}

   .header {
     overflow: hidden;
  background-color: #f1f1f1;
  padding: 1% 1%;
    }
       .header a {
        float: left;
  color: black;
  text-align: center;
  padding: 12px;
  text-decoration: none;
  font-size: 18px; 
  line-height: 25px;
  border-radius: 4px;
    }
    .header-right {
  float: none;
    }
 </style>
 <script type="text/javascript">
   function loadiFrame() {
  var parentContact = window.parent.Xrm.Page.data.entity.attributes.get('primarycontactid').getValue();
  if(parentContact != null){
    var parentContactId = parentContact[0].id.replace("{", "").replace("}", "");
    var srcVal = "https://<OrganizationName>.crm11.dynamics.com/_root/hierarchy.aspx?oId=%7b"+parentContactId+"%7d&etc=2&sitemappath=SFA%7cCustomers%7cnav_conts&pagemode=iframe";
    document.getElementById("contactFrame").src = srcVal;
  }
   }
 </script>
 <meta></head>
 <body onfocusout="parent.setEmailRange();" style="overflow-wrap: break-word;">
   <div>
  <div class="header">
    <a href="#default" class="logo">Parent Contact Hierarchy</a>
   <div class="header-right">
     <button class="button" onclick="loadiFrame()">Generate Hierarchy</button>
   </div>
  </div>
  <iframe id="contactFrame" src="" name="Parent Contact hierarchy" scrolling="auto" width="100%" height="100%" frameborder="0"></iframe>
   </div>
 </body>
</html>

In above code we can see that we have placed one button control 'Generate Hierarchy' and on click of that we are loading iFrame which calls below URL by passing Primary Contact id which we have fetched in JavaScript function.


https://<OrganizationName>.crm11.dynamics.com/_root/hierarchy.aspx?oId=%7b"+parentContactId+"%7d&etc=2&sitemappath=SFA%7cCustomers%7cnav_conts&pagemode=iframe"
  • Go to Customizations Customize the System.
  • Under Components, select Entity Account > Forms > Account Form.
  • Insert new tab on the form and add web-resource which we have created above.
  • Publish the customization.
Now, finally its time to check contact hierarchy visualization on account form.


Hope it helps you to understand the hierarchy visualization and to play around it.

Happy learning!!